
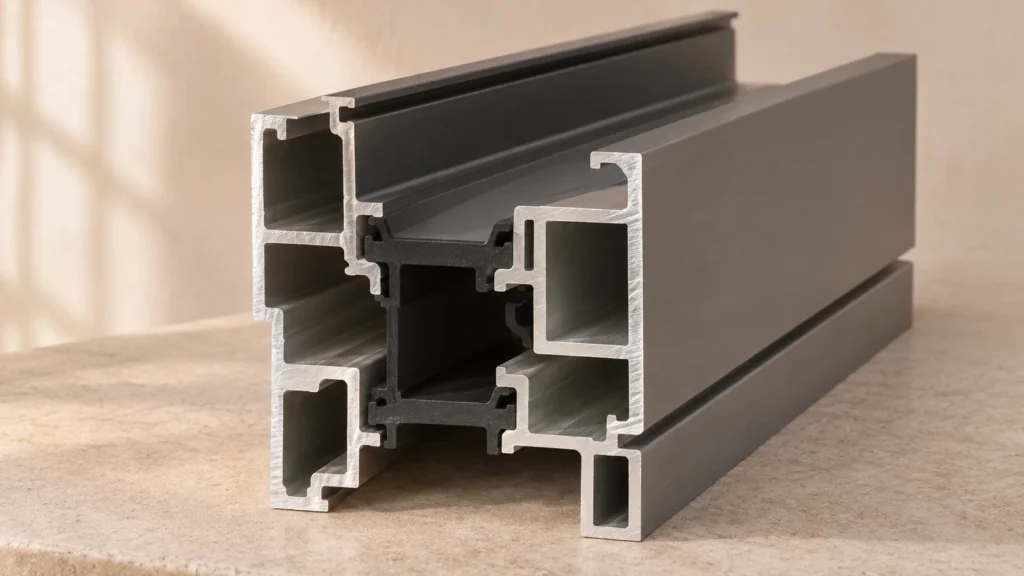
Thermal break windows use an insulating material between the inner and outer parts of a metal frame to slow heat flow. In an aluminum window, that interruption can keep the inside frame surface warmer during cold conditions and reduce heat transfer through the frame in either direction. The glass, spacer, sash and perimeter installation all affect the result. Start by comparing whole-window ratings for the configurations on offer, then check how each frame will connect to the wall.
A quote for thermal break windows might list the glass build-up and the finish but give little information about the frame. Ask for the product designation, a cross-section and the published performance data for that assembly. Put the section beside the drawing of the opening and follow the frame from the sill to the jamb. This makes it easier to see what is included in the window system and which connections the installer has to complete on site.
Table of Contents
1. Find the insulating separation in thermal break windows
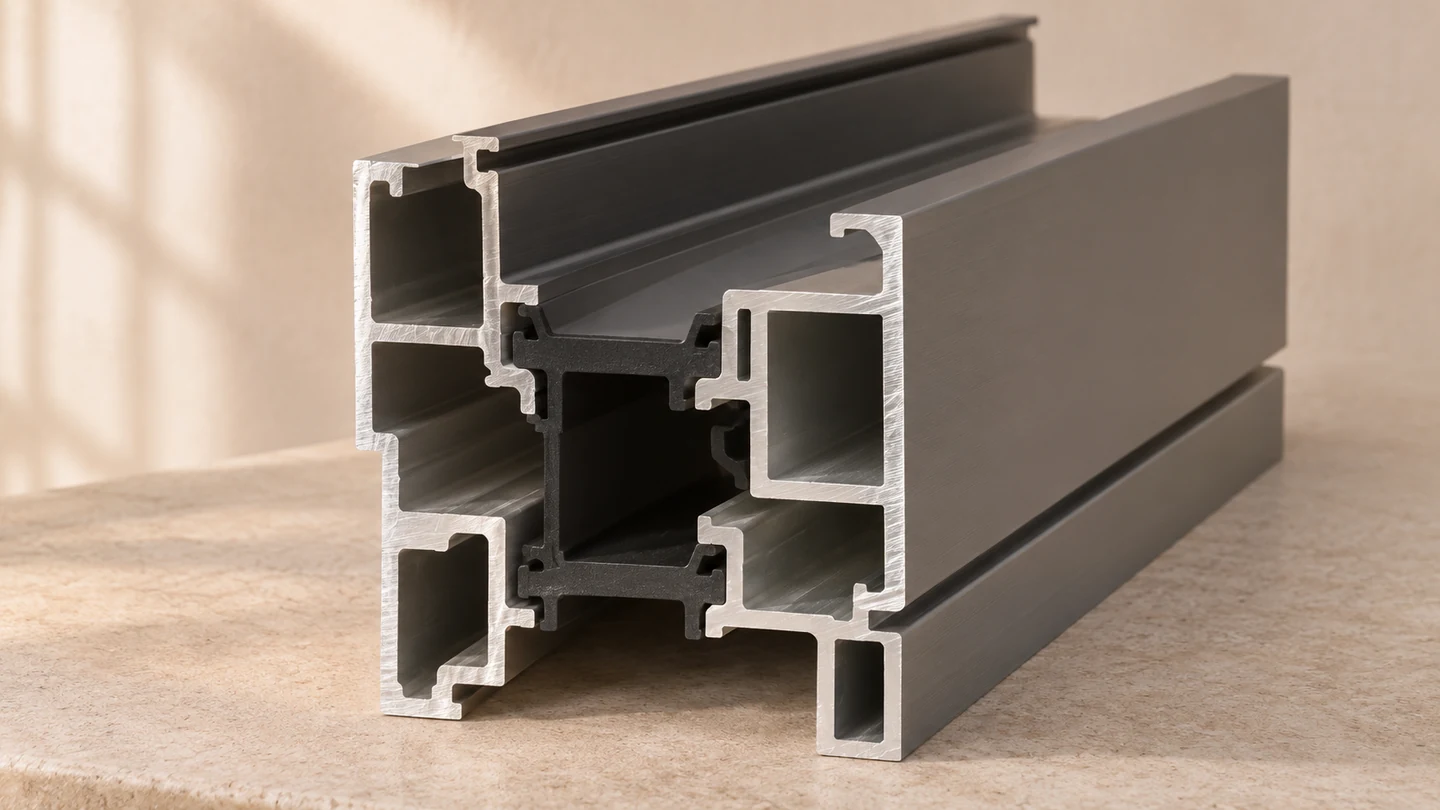
On a section drawing of thermal break windows, look for the low-conductivity material separating the inner and outer metal profiles. It may appear as one or more polymer strips linking the aluminum sections. Follow that separation through the fixed frame and, on an operable window, through the sash. Compare the sill, head and jamb sections. If the opening uses intermediate vertical or horizontal members, ask for those sections as well so you can see how the profiles meet.
The insulation between the frame sections addresses conduction through the metal. The sealed cavity between panes serves a separate purpose, and the spacer at the edge of the glass affects heat flow there. A quote for double glazing therefore still needs to state how the frame is built. The section also helps identify where weather seals sit relative to the insulating separator. See the Department of Energy’s guide to window frames, glazing and spacers.
2. Compare ratings for the complete window
When you compare thermal break windows, ask for the whole-window U-factor in a consistent unit system. A lower U-factor means less heat flows through the window for a given temperature difference. A center-of-glass figure describes a limited area and leaves out the frame, sash and glass edge. Those parts occupy a greater share of some window sizes and configurations than others. Check that the submitted rating applies to the product series, operating type and glazing specified in the quote.
Also compare the solar heat gain coefficient and visible transmittance. The first tells you how much incident solar energy enters through the assembly. The second describes how much visible light passes through. If air leakage data are provided, use the same rating method for comparisons. A change from a fixed light to an operable sash is a reason to review the submitted performance data. See the NFRC overview of product certification and the ratings it covers.
3. Match the glass and spacer to the opening
For thermal break windows in a room that receives long periods of direct sun, compare the glazing’s solar performance with the proposed shading and the need for daylight. For an opening where heat loss is a major concern, pay close attention to whole-window U-factor and edge-of-glass performance. The same window series can be supplied with different coatings, cavity fills and spacer options. Confirm the glass build-up on the submittal so a substitution can be evaluated before manufacturing.
Two windows with the same pane count can perform differently if their coatings or spacers differ. A spacer with lower thermal conductance can help raise the glass-edge temperature in cold conditions, where the perimeter often cools before the middle of the pane. Ask the supplier to identify the spacer and any coating in the proposed assembly. Then check whether the rating you used in the comparison refers to that glazing combination and the matching frame.
4. Read condensation by location and timing
Even thermal break windows can develop indoor condensation if a surface falls below the dew point of the room air. Where droplets form on a cold morning matters. Water at the glass edge directs attention to that part of the assembly, while moisture on the frame or nearby reveal warrants a look at those surfaces and the perimeter detail. Note the indoor temperature and humidity, outdoor conditions, and whether blinds or furniture restricted warm air circulation near the window.
Moisture between the panes of a sealed insulating glass unit warrants a check of the unit and its edge seal. Water that appears around the sill only during wind-driven rain warrants a separate review of rain entry and drainage. A condensation rating can help compare products tested or rated on the same basis. Check the area beside the frame for similar moisture at the same time. Actual conditions in a room can change with ventilation, occupancy and drying construction materials, so a rating should be read alongside what you observe on site.
5. Resolve the frame-to-wall detail before ordering
Thermal break windows need a perimeter detail that coordinates heat flow, air leakage and water management at the opening. On the drawing, trace the wall insulation toward the frame and look for gaps at the sill, jamb and head. Check how the frame is supported and how flashings and attachment hardware fit around it. Continuous metal around the opening can create a separate path for heat flow, so a window with a good rating can still have a cold surrounding reveal.
Trace the wall’s air control layer to the designated sealing surface on the frame. Then follow the path water would take at the sill and confirm where it exits. For example, a sill pan that collects water needs a route to discharge it. Ask the window supplier and wall designer to resolve these transitions on the same detail before the opening dimensions are finalized. The guide to building envelope components and failures explains how these layers work together.
6. Check installation before the trims go on
When thermal break windows arrive, match their labels and glazing records to the approved schedule. Before the opening is closed in, check that the frame is supported at the locations shown by the manufacturer, with the specified anchors and clearances. Confirm that the operable sash opens, closes and locks smoothly. A frame forced out of square during fixing can change how the sash compresses its seals, even if the glass and frame match the approved submittal.
At the perimeter, look for continuity of the specified air seal, particularly where it crosses corners or transitions between materials. Check that the frame’s drainage slots and the wall detail’s discharge paths remain open. Photograph the sill pan, corner transitions and supports before the trims hide them. If the project calls for field water or air testing, agree which openings will be tested and when, so the team can address any issues while the details remain accessible.
7. Review substitutions against the approved assembly
A substitute for thermal break windows should be evaluated as a complete unit. Compare frame profiles, opening type, glass, spacer and applicable ratings, along with structural and weather performance for the project. If the replacement profile changes the sill height, frame depth or drainage position, return to the opening detail and check that the original connections still work. A similar appearance from the exterior tells you little about whether the replacement can use the same flashing and fixing arrangement.
A simple submittal review can make this comparison concrete. Mark one copy of the proposed section with the insulation, air seal and drainage route, then ask the supplier and installer to identify their responsibilities at each interface. Compare that copy with the first installed opening while the work is visible. See Aloda’s construction services for the types of building work the company undertakes, including the broader coordination needed around exterior openings.
8. Document what was installed and how it performs
Keep the product identification, glazing details and rated configuration for the thermal break windows installed at each type of opening. Add the approved perimeter detail and representative photographs before and after the trims go on. If occupants report a draft or damp patch later, the record helps you separate an issue at the sash, glass edge or wall junction from a change in indoor conditions. Keep any field test results with the corresponding opening references. The product record also helps match parts if a window needs servicing.
For an initial check of an existing window, take a close photo of the symptom, a wider photo of the opening and a note of when it occurs. Include the label or product reference if you can find it. To discuss selection or installation of thermal break windows, contact Aloda with the opening details and any ratings or section drawings available. A comparison grounded in those documents can show which aspects of the assembly still need verification.
Frequently Asked Questions
Are double-glazed aluminum windows thermally broken?
Double glazing refers to the panes of glass. A thermally broken frame has an insulating separator between its inner and outer metal sections. Check the frame and sash drawings for that feature and request the whole-window rating for the proposed combination.
Do these windows eliminate condensation?
A thermally broken frame can reduce the chance of condensation on its inside surface in cold conditions. Whether droplets form still depends on surface temperature and indoor dew point, including at the glass edge and perimeter of the opening.
Can I compare windows using just the width of the thermal break?
Use a comparable whole-window rating for the specified frame, glazing and operating type. The width of the insulating separator describes one feature. The shape of the profiles, spacer, seals and other heat paths also influence performance.


